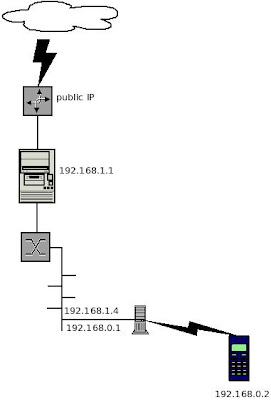
Awalnya ingin browsing lewat WiFi PDA saya. Kalau beli Access Point lumayan mahal :) .Langsung putar otak, dan langsung tertuju ke netbook. Hehehe... kenapa tidak saya manfaatkan nih WiFi di-netbook buat jadi Access Point ! Berikut skema diagramnya CMIIW...
Okay langsung saja, berikut step by step-nya. Seharusnya step ini berlaku pada semua versi openSUSE :
1. Yang pasti harus ada satu Network Card Interface ( NIC ) dan WiFi-nya ( Yang bertindak sebagai Access Point ).
Berikut saya beri IP untuk masing-masing ethernet
-
eth0 ( ethernet 0 ) =
192.168.1.4 -
wlan0 ( Wireless LAN ) =
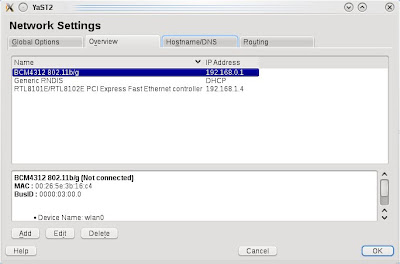
192.168.0.12. Kita coba masuk ke yast untuk konfigurasi masing-masing ethernet-nya :
Yast2 > Network Devices > Network Settings Kita masuk tab "
Overview"
Beri IP pada masing ethernet diatas.
- Untuk Setting firewall eth0 , kita set sebagai "
External Zone"
- Untuk Setting firewall wlan0 , kita set sebagai "
Internal Zone".
Setelah itu, kita masuk ke tab "
Routing", Centang "
Enable IP Forwarding".
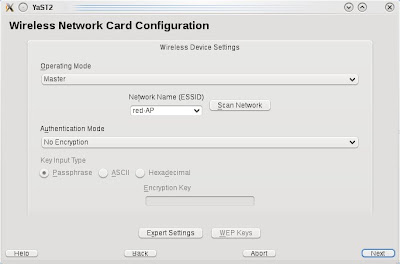
Lalu kita set Sebagai "
Master" dan buat nama Access Point-nya, misal kita namakan "
red-AP". Kita coba tanpa enkripsi dulu. Kita Ok semua.
 3.
3. Agar si client menerima IP secara otomatis, maka kita membutuhkan DHCP server, kita install packet dhpc server.
redarix:/ # zypper in yast2-dhcp-server dhcp-server4. Setelah itu kita konfigurasi DHCP Server-nya.
- Pada "
Card Selection" kita pilih wlan0 ( wireless ethernet ) yang akan membagikan DHCP atau bertindak sebagai DHCP Server. Centang "
Open Firewall for Selected Interfaces".
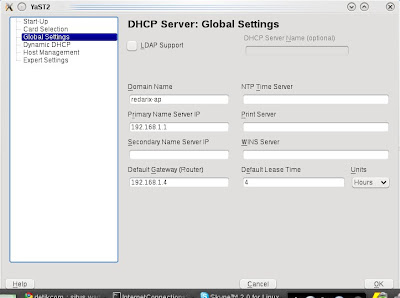
- Pada "
Global Settings" kita isi sebagai berikut :
- Domain Name : redarix-ap
- Primary Name Server IP : 192.168.1.1 --> DNS Server dari Server, untuk mengetahui IP DNS Server.
gunakan perintah :
redarix:/ # cat /etc/resolv.conf### /etc/resolv.conf file autogenerated by netconfig!
#
# Before you change this file manually, consider to define the
# static DNS configuration using the following variables in the
# /etc/sysconfig/network/config file:
# NETCONFIG_DNS_STATIC_SEARCHLIST
# NETCONFIG_DNS_STATIC_SERVERS
# NETCONFIG_DNS_FORWARDER
# or disable DNS configuration updates via netconfig by setting:
# NETCONFIG_DNS_POLICY=''
#
# See also the netconfig(8) manual page and other documentation.
#
# Note: Manual change of this file disables netconfig too, but
# may get lost when this file contains comments or empty lines
# only, the netconfig settings are same with settings in this
# file and in case of a "netconfig update -f" call.
#
### Please remove (at least) this line when you modify the file!
search redarix.org redserver.org
nameserver 192.168.1.1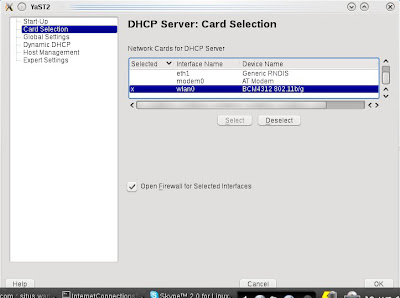
- Default Gateway ( Router ) : 192.168.1.4 --> eth0 bertindak sebagai gateway.
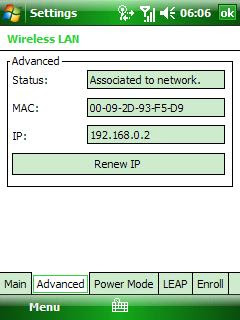
- Beri range IP untuk DHPC Server, saya beri 192.168.0.2 s/d 192.168.0.5 agar client dapat range IP antara 192.168.0.2 s/d 192.168.0.5
- Setelah itu kita OK semua.
 5.
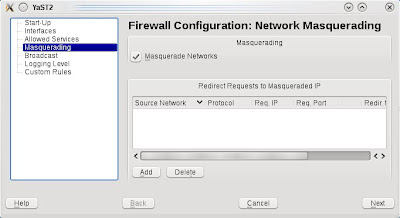
5. Kemudian kita masuk ke Firewall, untuk enable Masquerading / NAT ( fungsinya untuk mentranslasikan IP local kita biar kita bisa browsing ke internet maupun sebaliknya CMIIW... ).
Yast2 > Security and Users > Firewall. Kita enable "
Masquerading Networks".
 6.
6. Sekarang Netbook anda sudah siap menjadi Access Point :)